Easy Book Drawing: A Step-by-Step Guide for Beginners
Easy Book Drawing can be a delightful experience for artists of all levels. Whether you’re an aspiring illustrator, a student working on a school project, or someone who simply enjoys sketching in their free time, mastering the art of drawing books is easier than you might think. This guide will walk you through the process of creating simple yet beautiful book drawings, along with tips, techniques, and essential tools to enhance your skills.
Why Draw Books?
Books are an integral part of our lives, symbolizing knowledge, creativity, and history. Drawing them not only hones your artistic skills but also allows you to explore different styles and techniques. Here are a few reasons to practice drawing books:
- Versatility: Books can be drawn in various positions—open, closed, stacked, or leaning.
- Creative Expression: You can add unique details like bookmarks, scribbles, or even personalized covers.
- Skill Development: Drawing books helps improve your perspective and shading skills.
Tools You’ll Need
Before diving into the drawing process, gather these essential tools:
- Pencil and Eraser: A basic pencil and a soft eraser for sketching and corrections.
- Paper: High-quality drawing paper for clean, crisp lines.
- Ruler: For creating straight edges and maintaining symmetry.
- Fine-liner Pens: For outlining and adding details.
- Colored Pencils or Markers: To bring your drawings to life with color.
Step-by-Step Instructions for Drawing a Book
Follow these simple steps to draw a book effectively:
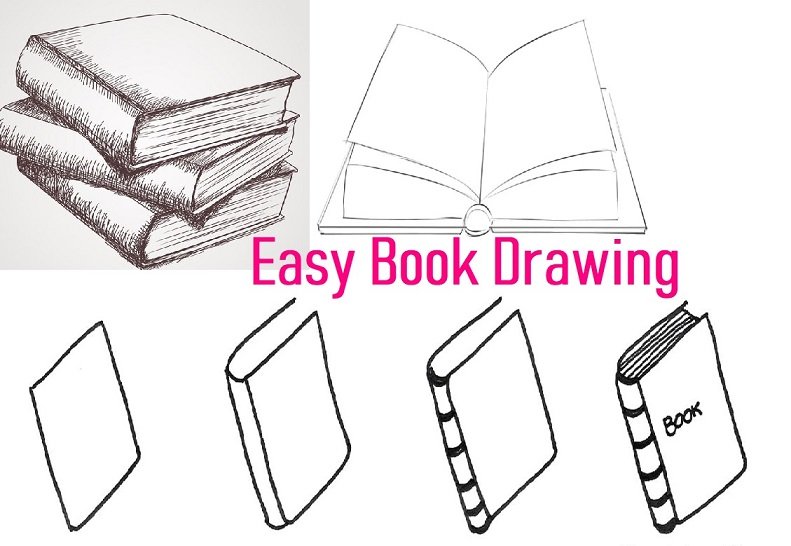
1. Drawing a Closed Book
- Sketch the Basic Shape:
- Start by drawing a rectangle to represent the book’s cover.
- Ensure the corners are sharp and the edges are straight using a ruler.
- Add the Spine:
- Draw a vertical line parallel to one of the shorter edges.
- Connect the spine to the rectangle, making it slightly rounded for realism.
- Define the Edges:
- Add lines to indicate the thickness of the book’s pages and cover.
- Add Details:
- Sketch lines on the spine to represent binding.
- Include minor details like a title or decorative elements.
2. Drawing an Open Book
- Outline the Pages:
- Draw two slightly curved rectangles side by side to represent the open pages.
- Create the Fold:
- Add a curved line in the middle to represent the crease where the pages meet.
- Add Depth:
- Sketch the edges of the pages to give the book a 3D appearance.
- Detail the Text:
- Lightly sketch horizontal lines to mimic printed text.
3. Drawing a Stack of Books
- Start with the Bottom Book:
- Draw a rectangle as the base of the stack.
- Add Books on Top:
- Repeat the rectangle shape, slightly shifting each one to create a staggered look.
- Include Details:
- Add titles, spine designs, or bookmarks for variation.
Tips and Techniques
- Perspective: Use vanishing points to draw books in perspective for a more dynamic look.
- Shading: Add shadows and highlights to enhance depth and realism.
- Textures: Experiment with textures for the book cover, such as leather or fabric.
- References: Use real books as references to capture accurate proportions and details.
Common Mistakes and How to Avoid Them
- Uneven Lines: Always use a ruler for straight edges.
- Lack of Depth: Incorporate shading and perspective to avoid flat drawings.
- Overloading Details: Start simple and gradually add details as you gain confidence.
Creative Ideas for Book Drawings
- A stack of books with varying cover designs.
- An open book with fluttering pages.
- A magical book with glowing effects and intricate details.
- A bookshelf filled with books of different shapes and sizes.
Table: Comparison of Book Drawing Techniques
| Technique | Description | Skill Level |
|---|---|---|
| Closed Book | Simple rectangular shape with added spine details | Beginner |
| Open Book | Focus on symmetry and page details | Intermediate |
| Stack of Books | Layered rectangles with varying designs | Advanced |
| Perspective View | 3D effect using vanishing points | Advanced |
Frequently Asked Questions
Q: Do I need to be good at drawing to sketch books?
A: Not at all! With practice and the right techniques, anyone can learn to draw books effectively.
Q: Can I use digital tools for book drawing?
A: Absolutely. Software like Procreate or Adobe Illustrator is excellent for creating detailed book illustrations.
Q: How can I make my book drawings more realistic?
A: Focus on shading, perspective, and small details like page texture or bookmarks.
Conclusion
Drawing books is a rewarding and enjoyable activity that anyone can master with practice. By following the techniques and tips outlined in this guide, you’ll be well on your way to creating impressive book sketches. Remember, the key to improvement lies in consistent practice and experimenting with new ideas. So grab your tools and start drawing today!
Disclaimer:
The information in this article is for educational purposes only. Results may vary depending on individual skill levels and dedication. Always practice regularly to improve your artistic abilities.